Digital Filtering in Faust and PD
This appendix describes use of the Faust programming languageK.1by Yann Orlarey [61,31] to generate real-time DSP plugins from a high-level specification. In addition to generating efficient inner loops, Faust supports Graphical User Interface (GUI) specification in the source code, and can emit code for various application and plugin environments.K.2 Moreover, Faust can generate easy-to-read block diagrams directly from the source, illustrating signal flow and processing graphically. This appendix focuses on generating pd, LADSPA, and VST plugins from a simple Faust program specifying a resonator driven by white noise.
The software discussed in this appendix can be downloaded as a compressed tarball:
http://ccrma.stanford.edu/~jos/faust/faustpd.tar.gz
Additional software and more advanced examples can be found in [85].
A Simple Faust Program
Figure K.1 lists a minimal Faust program specifying the constant-peak-gain resonator discussed in §B.6.4. This appendix does not cover the Faust language itself, so the Faust Tutorial, or equivalent, should be considered prerequisite reading. We will summarize briefly, however, the Faust operators relevant to this example: signal processing blocks are connected in series via a colon (:), and feedback is indicated by a tilde (~). The colon and tilde operators act on ``block diagrams'' to create a larger block diagram. There are also signal operators. For example, a unit-sample delay is indicated by appending a prime (') after a signal variable; thus, x' expands to x : MEM and indicates a signal obtained by delaying the signal x by one sample.
Function application applies to operator symbols as well as names; thus, for example, +(x) expands to _,x : +, and *(x) expands to _,x : *, where _ denotes a simple ``wire''. There is a special unary minus in Faust (as of release 0.9.9.4), so that -x is equivalent to 0 - x. However, -(x) still expands to _,x : -, which is a blockdiagram that subtracts signal x from the input signal on _ .
The with block provides local definitions in the context of the process definition.K.3
Other aspects of the language used in this example should be fairly readable to those having a typical programming background. K.4
process = firpart : + ~ feedback
with {
  bw = 100; fr = 1000; g = 1; // parameters - see caption
  SR = fconstant(int fSamplingFreq, <math.h>); // Faust fn
  pi = 4*atan(1.0);    // circumference over diameter
  R = exp(0-pi*bw/SR); // pole radius [0 required]
  A = 2*pi*fr/SR;      // pole angle (radians)
  RR = R*R;
  firpart(x) = (x - x'') * g * ((1-RR)/2);
  // time-domain coefficients ASSUMING ONE PIPELINE DELAY:
  feedback(v) = 0 + 2*R*cos(A)*v - RR*v';
};
|
Constants such as RR in Fig.K.1 are better thought of as
constant signals. As a result, operators such as *
(multiplication) conceptually act only on signals. Thus, the
expression
2*x denotes the constant-signal
![]() muliplied
pointwise by the signal x. The Faust compiler does a good job
of optimizing expressions so that operations are not repeated
unnecessarily at run time. In summary, a Faust expression expands
into a block diagram which processes causal signals,K.5 some of which may be constant signals.
muliplied
pointwise by the signal x. The Faust compiler does a good job
of optimizing expressions so that operations are not repeated
unnecessarily at run time. In summary, a Faust expression expands
into a block diagram which processes causal signals,K.5 some of which may be constant signals.
Generating Faust Block Diagrams
When learning the Faust language, it can be helpful to generate a block diagram using the -svg option. For example, the command
> faust -svg cpgr.dspcreates a subdirectory of the current working directory named cpgr.dsp-svg which contains a ``scalable vector graphics'' (.svg) file for each block-diagram expression in cpgr.dsp.K.6For this example, there is a block diagram generated for the process line, and for each of the last five lines in the with clause (not counting the comment).
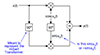
Figure K.2 shows the block diagram generated for the main process block from Fig.K.1:
process = firpart : + ~ feedbackThe dot on each block indicates its standard orientation (analogous to a ``pin 1'' indicator on an integrated circuit chip). The small open square at the beginning of the feedback loop indicates a unit sample delay introduced by creating a signal loop. Needless to say, it is important to keep track of such added delays in a feedback loop.
![\includegraphics[width=0.7\twidth]{eps/cpgr-process}](http://www.dsprelated.com/josimages_new/filters/img2485.png)
Figure K.3 shows the block diagram generated for the firpart abstraction:
firpart(x) = (x - x'') * g * ((1-RR)/2);
![\includegraphics[width=\twidth]{eps/cpgr-firpart}](http://www.dsprelated.com/josimages_new/filters/img2486.png)
Similarly, Fig.K.4 shows the block diagram generated for the feedback path:
feedback(v) = 0 + 2*R*cos(A)*v - RR*v';If not for the added sample of delay in the feedback loop (indicated by the small open square in Fig.K.2), the feedback-path processing would have been instead 0 + 2*R*cos(A)*v' - RR*v''.
![\includegraphics[width=\twidth]{eps/cpgr-feedback}](http://www.dsprelated.com/josimages_new/filters/img2487.png)
Note that the block diagrams are drawn as though all details of the expression are to be evaluated every sample. However, the Faust compiler instead computes constant expressions at init time and allocates memory locations for them. More generally, the Faust compiler separately optimizes full-rate signals at the sampling rate (calculated in the inner loop), slowly varying signals (updated at the ``buffer rate'' outside of the inner loop--currently every 64 samples), and constant signals (evaluated once at initialization time).
Testing a Faust Filter Section
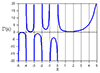
It takes a bit of experience to write a correct Faust program on the first try. Therefore, we often have to debug our programs by some technique. Typically, inspecting the automatically generated block diagrams and listening to the results are tools enough for debugging Faust source code. However, sometimes it is useful to verify the output signal(s) in more detail. For this purpose, Faust has a useful ``architecture file'' named plot.cpp which results in generation of a main C++ program that simply prints the output signal(s) to the standard output. This printout can be used to plot the output (using, e.g., gnuplot) or compare it to the output of some other program. This section gives an example of comparing the impulse response of the filter in Fig.K.1 to the output of a matlab version (Chapter 2). Specifically, we will compare the printed output from the Faust-generated program to the output of the matlab test program shown in Fig.K.5.
SR = 44100; % Sampling rate fr = 1000; % Resonant frequency bw = 100; % Bandwidth g = 1; % Peak gain N = 10; % Samples to generate in test R = exp(-pi*bw/SR); % pole radius A = 2*pi*fr/SR; % pole angle (radians) firpart = g * [1 0 -1] * (1-R^2)/2; feedback = [1 -2*R*cos(A) R^2]; % freq-domain coeffs freqz(firpart,feedback); % freq-response display format long; h = impz(firpart,feedback,N) % print impulse response |
In our Faust program, we need a test impulse, e.g.,
  process = 1-1' : firpart : + ~ feedback
  with { ... <same as before> ... };
The signal
Suppose the file cpgrir.dsp (``Constant-Peak-Gain Resonator Impulse-Response'') contains our test Faust program. Then we can generate the impulse-response printout as follows at the command line:
  > faust -a plot.cpp -o cpgrir-print.cpp cpgrir.dsp
  > g++ -Wall -g -lm -lpthread cpgrir-print.cpp -o cpgrir-print
  > cpgrir-print -n 10
The first line generates the C++ program cpgrir.cpp from the Faust source file cpgrir.dsp using the architecture file plot.cpp. The second line compiles the C++ file to produce the executable program cpgrir-print. Finally, the third line generates and prints the first 10 samples of the output signal (anything more than the number of filter coefficients is usually enough), which is our desired impulse response:K.7
   h = [    0.00707331  0.0139039   0.013284
            0.012405    0.0112882   0.00995947
            0.00844865  0.00678877  0.00501544
            0.00316602      ... ]
The matlab version produces the following impulse response:
h =
 [ 0.00707328459864603 0.01390382707778288 0.01328399389241600
   0.01240496991806334 0.01128815312793390 0.00995943544693653
   0.00844861689634155 0.00678874919376101 0.00501542304704597
   0.00316601431505539 ... ]
Since matlab uses double-precision floating-point while Faust only supports single-precision floats, we will normally see differences after six or so decimal digits.
A Look at the Generated C++ code
Running Faust with no architecture file, e.g.,
> faust cpgrir.dspcauses the C++ signal-processing code to be printed on the standard output, as shown for this example in Fig.K.6. Notice how the constant subexpressions are computed only once per instance in the instanceInit member function. Also, even in instanceInit, which is only called once, repeated computation of
  class mydsp : public dsp {
  private:
    float fConst0;    float fConst1;
    int   iVec0[2];   float fConst2;
    int   iVec1[3];   float fConst3;   float fRec0[3];
  public:
    virtual int getNumInputs()    { return 0; }
    virtual int getNumOutputs()   { return 1; }
    static void classInit(int samplingFreq) { }
    virtual void instanceInit(int samplingFreq) {
      fSamplingFreq = samplingFreq;
      fConst0 = expf((0 - (314.159271f / fSamplingFreq)));
      fConst1 = (fConst0 * fConst0);
      for (int i=0; i<2; i++) iVec0[i] = 0;
      fConst2 = ((2 * fConst0) * cosf((2764.601562f
                               / fSamplingFreq)));
      for (int i=0; i<3; i++) iVec1[i] = 0;
      fConst3 = (0.500000f * (1 - fConst1));
      for (int i=0; i<3; i++) fRec0[i] = 0; }
    virtual void init(int samplingFreq) {
      classInit(samplingFreq);
      instanceInit(samplingFreq); }
    virtual void buildUserInterface(UI* interface) {
      interface->openVerticalBox("faust");
      interface->closeBox(); }
    virtual void compute (int count, float** input,
                                     float** output) {
      float* output0 = output[0];
      for (int i=0; i<count; i++) {
        iVec0[0] = 1;
        int iTemp0 = iVec0[1];
        iVec1[0] = (1 - iTemp0);
        fRec0[0] = (((fConst3 * (1 - (iTemp0 + iVec1[2])))
                                   + (fConst2 * fRec0[1]))
                                   - (fConst1 * fRec0[2]));
        output0[i] = fRec0[0];
        // post processing
        fRec0[2] = fRec0[1]; fRec0[1] = fRec0[0];
        iVec1[2] = iVec1[1]; iVec1[1] = iVec1[0];
        iVec0[1] = iVec0[0];
      }
    }
  };
|
Generating a Pure Data (PD) Plugin
This section illustrates making a pd plugin using the Faust architecture file puredata.cpp, and Albert Gräf's faust2pd script (version 0.9.8.6--also included in the Planet CCRMA distribution). Familiarity with Pure Data (the pd program by Miller Puckette [65,66]) is assumed in this section. Also, the original faust2pd paper [31] contains the most complete description of faust2pd at the time of this writing.
Even if one prefers writing real-time signal-processing programs in C++, C, or assembly language,K.8the ability to generate user interfaces and plugins with Faust is compellingly useful.
To illustrate automatic generation of user-interface controls, we will add two ``numeric entry'' fields and one ``horizontal slider'' to our example of Fig.K.1. These controls will allow the plugin user to vary the center-frequency, bandwidth, and peak gain of the constant-peak-gain resonator in real time. A complete listing of cpgrui.dsp (``Constant-Peak-Gain Resonator with User Interface'') appears in Fig.K.7.
declare name "Constant-Peak-Gain Resonator"; declare author "Julius Smith"; declare version "1.0"; declare license "GPL"; /* Controls */ fr = nentry("frequency (Hz)", 1000, 20, 20000, 1); bw = nentry("bandwidth (Hz)", 100, 20, 20000, 10); g = hslider("peak gain", 1, 0, 10, 0.01); /* Constants (Faust provides these in math.lib) */ SR = fconstant(int fSamplingFreq, <math.h>); PI = 3.1415926535897932385; /* The resonator */ process = firpart : + ~ feedback with { R = exp(0-PI*bw/SR); // pole radius [0 required] A = 2*PI*fr/SR; // pole angle (radians) RR = R*R; firpart(x) = (x - x'') * (g) * ((1-RR)/2); // time-domain coeffs ASSUMING ONE PIPELINE DELAY: feedback(v) = 0 + 2*R*cos(A)*v - RR*v'; }; |
Generating the PD Plugin
The plugin may be compiled as follows:
  > faust -a puredata.cpp -o cpgrui-pd.cpp cpgrui.dsp
  > g++ -DPD -Wall -g -shared -Dmydsp=cpgrui \
        -o cpgrui~.pd_linux  cpgrui-pd.cpp
The first line uses faust to generate a compilable .cpp file, this time using the architecture file puredata.cpp which encapsulates the pd plugin API. The second line (which wraps) compiles cpgrui-pd.cpp to produce the dynamically loadable (binary) object file cpgrui~.pd_linux, which is our signal-processing plugin for pd. Such pd plugins are also called externals (externally compiled loadable modules). The filename extension ``.pd_linux'' indicates that the plugin was compiled on a Linux system.
Figure K.8 shows an example test patch,K.9 named cpgrui~-help.pd,K.10written (manually) for the generated plugin. By convention, the left inlet and outlet of a Faust-generated plugin correspond to control info and general-purpose messages. Any remaining inlets and outlets are signals.
![\includegraphics[width=3in]{eps/cpgruit-help}](http://www.dsprelated.com/josimages_new/filters/img2491.png) |
A simple ``bang'' message to the control-inlet of the plugin (sent by clicking on the ``button'' drawn as a circle-within-square in Fig.K.8), results in a list being sent to the control (left) outlet describing all plugin controls and their current state. The print object in Fig.K.8 prints the received list in the main pd console window. For our example, we obtain the following bang-response in the pd console:
  print: nentry /faust/bandwidth-Hz 100 100 20 20000 10
  print: nentry /faust/frequency-Hz 1000 1000 20 20000 1
  print: hslider /faust/peak-gain 1 1 0 10 0.01
These are the three controls we expected corresponding to the frequency, bandwidth, and gain of the resonator. However, note that the message-names generated for the controls have changed. In particular, spaces have been replaced by hyphens, and parentheses have been removed, to observe pd naming rules for messages [31].
Controls may be queried or set to new values in the plugin by sending the following pd messages:
- frequency-Hz [newval]
- bandwidth-Hz [newval]
- peak-gain [newval]
/faust/peak-gain, is the complete ``fully qualified path'' that can be used to address controls within a hierarchy of nested controls and abstractions. For example, if we were to add the instance argument ``foo'' to the plugin (by changing the contents of the plugin box to ``cpgrui~ foo'' in Fig.K.8), then the path to the peak-gain control, for example, would become /foo/faust/peak-gain (see [31] and the Faust documentation for more details and examples).
In the test-patch of Fig.K.8, the various controls are exercised using pd message boxes. For example, the message ``peak-gain'' with no argument causes the plugin to print the current value of the peak-gain parameter on its control outlet. Messages with arguments, such as ``peak-gain 0.01'', set the parameter to the argument value without generating an output message. The slider and number-box output raw numbers, so they must be routed through a message-box in order to prepend the controller name (``peak-gain'' in this case).
The plugin input signal (second inlet) comes from a noise~ object in Fig.K.8, and the output signal (second outlet) is routed to both channels of the D/A converter (for center panning).
In addition to the requested controls, all plugins generated using the puredata.cpp architecture file respond to the boolean ``active'' message, which, when given a ``false'' argument such as 0, tells the plugin to bypass itself. This too is illustrated in Fig.K.8. Note that setting active to ``true'' at load time using a loadbangK.11 message is not necessary; the plugin defaults to the active state when loaded and initialized--no active message is needed. The loadbang in this patch also turns on pd audio computation for convenience.
Generating a PD Plugin-Wrapper Abstraction
The test patch of Fig.K.8 was constructed in pd by manually attaching user-interface elements to the left (control) inlet of the plugin. As is well described in [31], one can alternatively use the faust2pd script to generate a pd abstraction containing the plugin and its pd controllers. When this abstraction is loaded into pd, its controllers are brought out to the top level using the ``graph on parent'' mechanism in pd, as shown in Fig.K.10.
The faust2pd script works from the XML file generated by Faust using the -xml option:
  > faust -xml -a puredata.cpp -o cpgrui-pd.cpp cpgrui.dsp
  > faust2pd cpgrui.dsp.xml
Adding the -xml option results in generation of the file cpgrui.dsp.xml which is then used by faust2pd to generate cpgrui.pd. Type faust2pd -h (and read [31]) to learn more of the features and options of the faust2pd script.
The generated abstraction can be opened in pd as follows:
> pd cpgrui.pdFigure K.9 shows the result. As indicated by the inlet~ and outlet~ objects, the abstraction is designed to be used in place of the plugin. For this reason, we will refer to it henceforth as a plugin wrapper.
![\includegraphics[width=\twidth]{eps/cpgrui-pd}](http://www.dsprelated.com/josimages_new/filters/img2492.png) |
Notice in Fig.K.9 that a plugin wrapper forwards its control messages (left-inlet messages) to the encapsulated plugin, as we would expect. However, it also forwards a copy of each control message to its control outlet. This convention facilitates making cascade chains of plugin-wrappers, as illustrated in faust2pd examples such as synth.pd.K.12
A PD Test Patch for the Plugin Wrapper
Figure K.10 shows pd patch developed (manually) to test the plugin wrapper generated by faust2pd. Compare this with Fig.K.8. Notice how the three controls are brought out to the plugin-wrapper object automatically using the ``graph on parent'' convention for pd abstractions with controllers. The bang button on the plugin resets all controls to their default values, and the toggle switch in the upper-right corner functions as a ``bypass'' switch (by sending the active message with appropriate argument). The previous mechanism of setting controls via message boxes to the control inlet still works, as illustrated. However, as shown in Fig.K.9 (or by opening the plugin-wrapper in pd), the control outlet simply receives a copy of everything sent to the control inlet. In particular, ``bang'' no longer prints a list of all controls and their settings, and controls cannot be queried.
![\includegraphics[width=3.8in]{eps/cpgrui-help}](http://www.dsprelated.com/josimages_new/filters/img2493.png) |
Generating a LADSPA Plugin via Faust
LADSPA stands for ``Linux Audio Developer Simple Plugin API'', and it is the most common audio plugin API for Linux applications. It can be considered the Linux counterpart of the widely used VST plugin standard for Windows applications. In the Planet CCRMA distribution, most of the LADSPA plugins are found in the directory /usr/lib/ladspa/. At the time of this writing, there are 161 audio plugins (.so files) in or under that directory.
To generate a LADSPA plugin from Faust source, it is merely necessary to use the ladspa.cpp architecture file, as in the following example:
  > faust -a ladspa.cpp cpgrui.dsp -o cpgruilp.cpp
  > g++ -fPIC -shared -O3 \
        -Dmydsp='Constant_Peak_Gain_Resonator' \
        cpgruilp.cpp -o cpgruilp.so
  > cp cpgruilp.so /usr/local/lib/ladspa/
(Recall that cpgrui.dsp was listed in Fig.K.7.) We see that the C++ compilation step calls for ``position-independent code'' (option -fPIC) and a ``shared object'' format (option -shared) in order that the file be dynamically loadable by a running program. (Recall that pd similarly required its externals to be compiled -shared.) The Faust distribution provides the make file /usr/lib/faust/Makefile.ladspacompile (among others) which documents such details.
Many Linux programs support LADSPA programs, such as the sound editor Audacity, the multitrack audio recorder/mixer Ardour, and the sequencer Rosegarden. However, for our example, we'll use a simple application-independent LADSPA effects rack called JACK Rack (select ``Applications / Planet CCRMA / Jack / JACK Rack'').
Figure K.11 shows the appearance of the jack-rack main window after addingK.13the plugin named Constant_Peak_Gain_Resonator. Note that the two numeric entry fields have been converted to horizontal sliders. (Vertical sliders are also converted to horizontal.) Also, the controller names have been simplified. A bug is that the default values for the controls are not set correctly when the plugin loads. (They were set manually to obtain Fig.K.11 as shown.)
![\includegraphics[width=3.5in]{eps/jack-rack}](http://www.dsprelated.com/josimages_new/filters/img2494.png) |
To test the LADSPA plugin, any program's audio output can be routed through jack-rack to the sound-out driver (typically ``ALSA PCM'' these days). For example, pd's audio output can be routed through jack-rack to alsa_pcm as shown in Fig.K.12.K.14
![\includegraphics[width=3.5in]{eps/jack-rack-connect}](http://www.dsprelated.com/josimages_new/filters/img2495.png)
Generating a VST Plugin via Faust
This section describes generation of a Windows VST plugin starting from Faust code, again using the constant-peak-gain resonator example.
The VST (Virtual Studio Technology) plugin standard was developed by Steinberg Media Technologies (makers of Cubase). It enjoys wide usage on Windows and Macintosh platforms. The Faust distribution contains the make-file /usr/lib/faust/Makefile.vstcompile for compiling and installing VST plugins using Xcode on a Mac OS-X machine. For our example, however, we'll create a Windows-format VST plugin (.dll file) using Microsoft Visual C++. The example was tested on a Muse Receptor.K.15
Because the Receptor does not support mono plugins, the process line in the Faust source in Fig.K.7 was modified as follows to make it stereo-compatible:
process = + : firpart : + ~ feedback <: (_,_)This version was named cpgrui_vst.dsp. To generate a VST plugin, we simply use a VST architecture file:
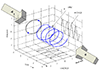
faust -a vst2p4.cpp cpgrui_vst.dsp -o cpgrui_vst.cppNext, the file cpgrui_vst.cpp was copied over to a Windows-XP machine with Microsoft Visual Studio Express installed (including Visual C++ 2008). The programming sample ``again'' from the Steinberg VST-2.4 SDK was copied to an adjacent directory cpgr and trivially modified to create a compilable C++ project. (Specifically, replace again.cpp by cpgrui_vst.cpp, rename again.vcproj to cpgr.vcproj, and change all occurrences of ``again'' to ``cpgrui_vst'' in cpgr.vcproj, and change ``Gain'' to ``CPGR'' to rename the plugin. Finally, double-click on cpgr.vcproj to launch Visual C++ on the cpgr project.) Selecting the menu item ``Build / Build cpgr'' creates cpgr/win/Debug/cpgr.dll (the VST plugin itself). To test the plugin, it was copied into the ``Unsupported Plugins'' folder on the Receptor, and installed by clicking the ``1 installs'' button on the Receptor's Setup page. After that, the plugin could be instantiated on a Receptor ``Mix'' channel, as shown in Fig.K.13, and Fig.K.14 shows the automatically generated edit window of the plugin.
![\includegraphics[width=\twidth]{eps/ReceptorRemoteControl}](http://www.dsprelated.com/josimages_new/filters/img2496.png) |
![\includegraphics[width=3.5in]{eps/ReceptorParamsScreenShot}](http://www.dsprelated.com/josimages_new/filters/img2497.png) |
Bypassing Windows
Beginning with Faust version 0.9.9.4j-par, a new makefile called Makefile.w32vstcompile is distributed in the examples directory. This makefile can be adapted to work on Fedora F8 Linux as follows.
- Download and install the following RPMs from SourceForge:
mingw-binutils-2.18.50-6.fc8.i386.rpm
mingw-gcc-core-4.2.1-6.fc8.i386.rpm
mingw-gcc-g++-4.2.1-6.fc8.i386.rpm
mingw-runtime-3.14-3.fc8.i386.rpm
mingw-w32api-3.11-3.fc8.i386.rpm
(Unfortunately, mingw is not in the standard yum repos yet.) - In Makefile.w32vstcompile, edit the VST line
to say where your vstsdk2.4 directory is located, and
change all occurrences of i586-mingw32msvc to
i386-mingw32.
- The plugin name defaults to ``FaustFx''. You can change this by
declaring the name in your Faust source. For the example
of the previous section, we could say
declare name "CPGR";
in place of the longer name used in Fig.K.7. (The longer name results in a plugin called ``ConstantPeakGainResonator''.) - After the make, simply copy the dll file to the Receptor and tell the
Receptor to install it on the Setup page of the Receptor Remote
Control program as before (which requires Windows or a Mac). While
one can press the Setup button on the Receptor front panel and rotate
the Top Display Knob to ``Install/Upgrade'' (the next-to-last entry),
there you will find ``0 files'' even when there is a file to install.
The manual documents that it is not allowed to install plugins from
the Receptor front panel, because some installs require a user
interface (such as to receive an authorization code). This is an
unfortunate and unnecessary restriction in our case that prevents
working entirely directly with the Receptor from a Linux environment.
The Receptor's ``Unsupported Plugins'' directory can be mounted as follows:
> mkdir /mnt/receptor
> mount -t cifs <ReceptorIPA>:hard\ drive/Program\ Files/VST\ Plugins/Unsupported\ Plugins \
        /mnt/receptor
(Remember to say umount /mnt/receptor when you are done.) The
Receptor's IP Address (typically assigned by DHCP) can also be viewed
by pressing the Setup button and rotating the Top Display Knob to that
field.
Generating a MIDI Synthesizer for PD
The faust2pd script (introduced in §K.5 above) also has a mode for generating MIDI synthesizer plugins for pd. This mode is triggered by use of the -n option (``number of voices''). For this mode, the Faust program should be written to synthesize one voice using the following three parameters (which are driven from MIDI data in the pd plugin):
- freq - frequency of the played note (Hz)
- gain - amplitude of the played note (0 to 1)
- gate - 1 while ``key is down'', 0 after ``key up''
Let's make a simple 8-voiced MIDI synthesizer based on the example Faust program cpgrs.dsp (``Constant-Peak-Gain Resonator Synth'') listed in Fig.K.15. In addition to converting the frequency and gain parameters to the standard names, we have added a classic ADSR envelope generator (defined in Faust's music.lib file) which uses the new gate parameter, and which adds the four new envelope parameters attack, decay, sustain, and release.
Compiling the example is the same as for a pd plugin, except that the -n option is used (8 voices is the maximum):
  > faust -xml -a puredata.cpp -o cpgrs-pd.cpp cpgrs.dsp
  > g++ -DPD -Wall -g -shared -Dmydsp=cpgrs \
        -o cpgrs~.pd_linux cpgrs-pd.cpp
  > faust2pd -n 8 -s -o cpgrs.pd cpgrs.dsp.xml
declare name "Constant-Peak-Gain Resonator Synth"; declare author "Julius Smith"; declare version "1.0"; declare license "GPL"; /* Standard synth controls supported by faust2pd */ freq = nentry("freq", 440, 20, 20000, 1); // Hz gain = nentry("gain", 0.1, 0, 1, 0.01); // frac gate = button("gate"); // 0/1 /* User Controls */ bw = hslider("bandwidth (Hz)", 100, 20, 20000, 10); import("music.lib"); // define noise, adsr, PI, SR, et al. /* ADSR envelope parameters */ attack = hslider("attack", 0.01,0, 1, 0.001); // sec decay = hslider("decay", 0.3, 0, 1, 0.001); // sec sustain = hslider("sustain",0.5, 0, 1, 0.01); // frac release = hslider("release",0.2, 0, 1, 0.001); // sec /* Synth */ process = noise * env * gain : filter with { env = gate : vgroup("1-adsr", adsr(attack, decay, sustain, release)); filter = vgroup("2-filter", (firpart : + ~ feedback)); R = exp(0-PI*bw/SR); // pole radius [0 required] A = 2*PI*freq/SR; // pole angle (radians) RR = R*R; firpart(x) = (x - x'') * ((1-RR)/2); // time-domain coeffs ASSUMING ONE PIPELINE DELAY: feedback(v) = 0 + 2*R*cos(A)*v - RR*v'; }; |
MIDI Synthesizer Test Patch
The example synth is loaded into pd like any plugin-wrapper. A manually written test patch (cpgrs-help.pd) is shown in Fig.K.16. Note that the standard MIDI-synth control parameters (freq, gain, gate) are handled behind the scenes and do not appear among the plugin GUI controls.
![\includegraphics[width=4in]{eps/cpgrs-help}](http://www.dsprelated.com/josimages_new/filters/img2498.png) |
To drive our MIDI synth, we need a source of MIDI data. Perhaps the simplest resource for this purpose is the Virtual Keyboard (vkeybd), which is standard in Red Hat Fedora 6, and in the planetccrma-menus at ``Applications / Planet CCRMA / MIDI / Vkeybd''). Figure K.17 shows a screen shot of the Virtual Keyboard with its key-range and velocity controllers displayed (menu item ``View / Key/Velocity''). The velocity controller sets the gain parameter, mapping MIDI velocity (0-127) to the unit interval (0-1). The key-range controller transposes the keyboard by octaves. Pressing a key determines, together with the key-range, the freq parameter in our synth. Pressing a key also sets the gate parameter to 1, and releasing it sets gate to 0. The ADSR envelope is triggered when gate transitions to 1, and it begins its ``release'' phase when gate transitions to 0, as is standard for ADSR envelopes triggered by a keyboard. Note that the bottom two rows of ASCII keyboard keys are mapped to virtual-keyboard keys, enabling the playing of chords in real time on the regular computer keyboard.
![\includegraphics[width=3.5in]{eps/vkeybd}](http://www.dsprelated.com/josimages_new/filters/img2499.png)
Figure K.18 illustrates the MIDI tab of qjackctl's Connect window after connecting the Virtual Keyboard MIDI output to pd's MIDI input.K.16
![\includegraphics[width=4in]{eps/jack-midi-connect}](http://www.dsprelated.com/josimages_new/filters/img2500.png) |
To play back a MIDI file (extension .mid), a nice way is to open it in Rosegarden (``Applications / Planet CCRMA / Sequencers / Rosegarden'') and connect Rosegarden's MIDI output to pd's MIDI input as above. (You can still play along on the Virtual Keyboard.)
Next Section:
Links to Online Resources
Previous Section:
Matlab Utilities