|
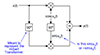
Hi Rick I put togther this example last year showing how to bit bang out the correct serial port patterns using the PC printer port data lines as the drivers. I did not work out the receive side as I had no intention of porting the DSK drivers and debugger, but I suppose it could also be done with a little effort. Serial Booting the VC33 and C31 from the PC printer port The following is taken from a message and has not been fully massaged into an application note. It took me about 5 hours to slap together the circuit and the code, so it may be a little rough on the edges. Never the less it works. Note that both the host side and DSP side code are given and that I used the DSK tools to generate the HEX file (much much easier to use!). Here are some other questions and answers that may come up. The receiving serial port (bootside) should be inactive when reset occurs. This simply means the FSR is inactive as the clock and data are dont care unless a frame start is detected. The serial port boot mode skips over the first two words of a normal boot from EPROM file. Dont ask why, its just that way and has been for a very long time. Incidentaly, note how stupid it was to even include the bus control in the header. This is a memory mapped register and can therefor be loaded as a data block. So the bootloader code could have been even simpler! The send side transmitter should be in the same state as the receiver except for the clock edge. Send and receive should use opposite edges unless you need to run at very fast rates in a bad environment in which case you will need to have some control over the skew. The configuration is given in the bootloader source code. Minimum pulse widths are 2*H when your external sources are synchronous to the receiving CPU's master clock. This is a kind of Nyquist limit that is imposed by the fact that each pin input is first passed through a set of synchronizing latches. If you are not synchronous, you need to be below the Nyquist rate. The data sheet shows 2.6*H, but the hard cold truth is that this is actualy 2.00001*H ... if the H clock rate is very slow. At speed the setup and hold times become significant enough to warrant the 2.6. PS: The TMX (PG version 1.0 and 1.1) VC33's have a slight problem with delays in the serial port that does limit the speed when used at min volatage, max speed and high temperature. This wont be a problem for a printer port link and is fixed in the production version (PG 1.2) currently shipping. There is no maximum width when configured in this mode since the clock is external. All you need to ensure is that the data bit is clean and stable at the time the sample is taken. In my code I ran the delay all the way to 50ms. This was teadiously slow even for this very short program. Please note however that the 'delay()' function has given me some problems in WIN98. I dont know exactly whats going on, but I suspect that Windows is trying to mis-manage the timers. So... I simply created my own delay the old fashioned brute force kind of way. Serial port receive configuration (from bootloader code comments) Recieve control: 0x111 (all pins are serial port pins) Global control : 0xA300000 RRESET = 1 Reset receive port RINT = 1 Enable RINT (will be polled in boot s/w) RTINT = 0 Recieve timer off RLEN = 3 32 bit FSRP = 0 active high DRP = 0 active high CLKRP = 0 active high RFSM = 0 Standard mode (non continuous, use FSX). RVAREN = 0 Fixed data rate signaling (Falling edge starts xmit) RCLKSRC = 0 External RSRFULL = 0 Polling bit RRDY = 0 Polling bit Expected waveform ______ _______________ FSR \_______________________________/////// \___________ _______ _______ _______ _______ _________ __ DR XXXXXX__MSB__X_______X_______X__LSB__XXXXXXXXXXXXXXXXX___MSB___X__ _ ___ ___ ___ ___ ___ ___ ___ ___ CLKR \___/ \___/ \___/ \___/ \___/ \___/ \___/ \___/ Making the connection The circuit construction I used is quite simple. I simply took a male DB25 connector and soldered in a 13x2 array of extra long wire wrap posts. I had to bend them out a little bit and clip off the 26th contact. I then clipped out the posts for D0-D5 leaving a little stub to solder to and replaced them with 330 ohm resistors (100 should be even better but I did not have that value in my desk drawer). I then used jumper wires with female wire-wrap post connectors on each end to make the connections to my test board. Note: The TMS320VC33 uses Schmidt Hysterisis inputs for all inputs except for the data bus. This helps considerably in quality signal reception. Host Side Code /*-------------------------------- Booting a C31/C33 from a printer port Keith Larson (c) Texas Instruments Inc, 2001 VC33 connections to printer port are as follows. Add a series resistor 100-470 ohms in series to prevent accidental buffer contention since each of the serial port lines can be configured as an output. D0 - CLKR D1 - DR D2 - FSR D3 - RESET D4 - INT3 Note: If you want to create a logic waveform you can modify the outport() function to also print in binary to a file or screen dump. ----------------------------------*/ #include <conio.h> #include <stdio.h> #include <stdlib.h> #include "dsk.h" #define CLKR (clkr^ 1) // 1 CLKRP #define DR (dr ^ 0) // 2 DRP #define FSR (fsr ^ 0) // 4 FSRP ulong boot_data[256]; uint port = 0x378; // LPT1 data address, 0x278 for LPT2 int RESET = 1; int INT3 = 1; int dr, clkr, fsr; int dat; char buf[82]; // // If this program is to run in a Windows DOS box // use this delay instead of the normal delay function // There is some kind of bug in WIN98. Apparently in // how the timers are interrupted. #define DELAY 0 // Try 50+ for very slow! void mydelay(int ms); void ReadHexFile(ulong *d, char *Name); // void serial_out(ulong val) { int s; ulong v; printf("Sending: %08lx ",val); clkr = 0<<0; dr = 0<<1; fsr = 1<<2; // FSR is active for more than 1 CLKR cycle for(s=0;s<2;s++) { dat = FSR|DR|CLKR; outport(port,0x18|dat); clkr^=1; // Clock twice with FSX=1 } mydelay(DELAY); for(s1;s>-1;s--) { fsr = 0<<2; // FSR goes back to inactive on 1st bit v=(val>>s)&1; dr = (int)v; printf("%d",dr); dr = dr<<1; dat = FSR|DR|CLKR;outport(port,0x18|dat); clkr^=1; dat = FSR|DR|CLKR;outport(port,0x18|dat); clkr^=1; mydelay(DELAY); } printf("\n"); } void main(void) { long L,A; ulong *sd; clrscr(); ReadHexFile(boot_data, "xf_togl.hex"); clkr = 0<<0; // clkr is inactive dr = 0<<1; fsr = 0<<2; // fsr is inactive dat = FSR|DR|CLKR; dat|=0x00; outport(port,dat); printf("I=0 R=0 %04x\n",dat); dat = FSR|DR|CLKR; dat|=0x08; outport(port,dat); printf("I=0 R=1 %04x\n",dat); dat = FSR|DR|CLKR; dat|=0x18; outport(port,dat); printf("I=1 R=1 %04x\n",dat); printf("Boot start\n"); mydelay(DELAY); // // Now running bootloader in serial mode // sd = boot_data+2; // skip memwidth and bus_control for(;;) { L = *sd++; // send block length serial_out(L); // zero terminates boot if(L==0) break; // if zero, done A = *sd++; // send block address serial_out(A); for(;L>0;L--) // send block { serial_out(*sd++); } } printf("Boot complete\n\n"); } //=================================================== // If this program is to run in a Windows DOS box // use this delay instead of the normal delay function // There is some kind of bug in WIN98 void mydelay(int ms) { int t; for(;ms>0;ms--) { for(t=0;t<500;t++) inport(port+1); } } void ReadHexFile(ulong *d, char *Name) { int cnt; char *c,*eptr; FILE *file; printf("preparing to read: %s\n",Name); file = fopen(Name,"rb"); if(file==NULL) { printf("cant open %s",Name); exit(1);} c = fgets(buf,80,file); if(c==NULL) { printf("invalid hex file\n"); exit(1);} cnt = 0; for(;;) { c = fgets(buf,80,file); if(c==NULL) break; *d++ = strtol(buf,&eptr,0); cnt++; } printf("%d lines read\n\n",cnt); } Assembly Code I used for Testing the Bootloader ;*************************************************************** ; XF_TOGL.ASM ; Keith Larson ; (c) Texas Instruments Inc, 2001 ; ; Toggles the XF0 and XF1 pins (and the IACK pin) at the loop ; rate. Add nops or some other kind of delay to change the ; pulse rates and widths. ; ; NOTE: Avoid 0x809800 and 0x809801 as these locations ; are used by the bootloader as stack space ;*************************************************************** .start "CODE",0x809802 .sect "CODE" .entry MAIN MAIN LOPOWER ldp @0x808064 ldi 0x1018,R0 sti R0,@0x808064 LOOP1 ldi 1000,RC RPTB LOOP2 ldi 0x22,IOF ldi 0x66,IOF LOOP2 iack @0x80A000 b LOOP1 *********** Resulting DSK generated Hex file ********* FILE2HEX 0x00000008 Bus Width <- Skip this in SP boot 0x000010f8 Bus Control ws=7 <- Skip this in SP boot 0x00000001 Dummy Section size 0x00809802 Dummy Start Address 0x00000000 Dummy Data 0x0000000a Section Size 0x00809802 Start Address 'CODE' 0x10800001 0x50700080 0x08601018 0x15208064 0x087b03e8 0x6480980a 0x08780022 0x08780066 0x1b20a000 0x6a00fffa 0x00000000 Terminate Load Anyone had experience with booting a C31 DSP via the DSP serial port? Specifically I am looking for PC code to control parallel port IO lines under Windows 95 to let me boot a DSP in order to program the flash on the board. We had been doing this via the emulator, but the pod just quit. Rather than continue doing it this way, I would rather put the effort into getting the boards up via the DSP serial port. The emulator GEL scripts never worked very well. They would sometimes run correctly and sometimes not. I have code to run on the DSP to let me program the flash if I can get the program into the ram on board. Rick Collins Arius - A Signal Processing Solutions Company Specializing in DSP and FPGA design http://www.arius.com 4 King Ave 301-682-7772 Voice Frederick, MD 21701-3110 301-682-7666 FAX |
|
|
Re: Using PC parallel port to boot DSP using sync serial port
Started by ●January 4, 2002