Using matlab2tikz to include a Matlab vector graphic in a LaTeX document
I am trying to add a Matlab graphic to a LaTeX document. I know there are various ways of achieving this and I hope somebody here can explain it to me.
I have already saved the Matlab graphic as .eps file and then included it in LaTeX via \includegraphics. The result is bad. The axes-labels are so small, I can barely read them. So I have tried saving the graphics as .png (saveas(fig,'graphic.png')). This way the axes labels are bigger, but the graphic still doesn't look nice.
So I have downloaded the matlab2tikz script from FileExchange. I then run the Matlab script, that generates my graphic. This script (this might be the problem) does a hell lot of other things besides creating the graphic. But in the end, I have only one figure, which I want to save as .tikz. So I run the matlab2tikz script. Then I try to include the .tikz file in my LaTeX document, using \input{graphic}. But it doesn't work, it says "TeX capacity exceeded". When I do the same for a different graphic it works fine - almost at least. I have two graphs in the other picture and the labels get mixed up.
Anyways, I now wonder, do you know a tutorial on how to use matlab2tikz properly? Or can you give me a brief explanation? I really need these graphics and I need them to look neat.

Two things that are helpful to do in order to include a Matlab generated figure into a LaTeX document is to set the size of the figure and to increase the size of the fonts in the figure.
As for setting the size of the figure, I use a Matlab short-cut with the following code,
title( '' )
height=3.65; width=3.65;
set( gcf, 'Units', 'inches' )
set( gcf, 'Position', [ 0 0 width height ] )
set( gcf, 'PaperUnits', 'inches' )
set( gcf, 'PaperSize', [ width height ] )
set( gcf, 'PaperPositionMode', 'Manual' )
set( gcf, 'PaperPosition', [ 0 0 width height ] )
box off
The value of 'height' and 'width' are set for my needs, so you'll likely need to adjust them for your purpose. I include a caption for the figure in LaTeX, that is why I remove the title of the Matlab figure.
Font sizes can be adjusted by including the 'FontSize' property. For example,
title('A Title', 'FontSize', 12); xlabel('X Axis', 'FontSize, 12); ylabel('Y Axis', 'FontSize, 12);
Similarly, the size of the values on the x and y axis can be set using,
set(gca, 'FontSize', 12);
If you're still having difficulties, post your files on-line so we can see what you are doing and perhaps suggest other ways of helping.
still, I have tried out the matlab2tikz script, which can be downloaded at Matlab File Exchange. When I create the figure in matlab and then perform the cleanfigure command of the matlab2tikz script before running this script, it works out fine.
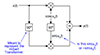
But I have to set the parameters of my figure before - just the way you explained. Now, at the end, there is a figure that I am still having troubles with. I am plotting two lines in one figure. The two lines have a common x-axis, but different y axes, the one is on the left, the other is on the right. When I try to include this figure in LaTeX, the legend has only one entry and the right axis is not labelled - the label appears on the left axis. Also I don't know how to set the parameters the way you have explained, in this figure.
Anyways, here is the matlab code:
figure
% grid lines
%ax1 = axes('xlim', [-25 0], 'ylim', [-35 -5]);
grid on
hold on
line(P_in,P_out,'Color','magenta');
ax1 = gca;
% grid lines
g_x = -30:1.25:5;
g_y = -35:2.5:-5;
% Modify the location of the x and y minor tick marks
ax1.XAxis.MinorTickValues = g_x;
ax1.YAxis.MinorTickValues = g_y;
grid(ax1,'minor')
ax1_pos = ax1.Position;
ax1.XAxisLocation = 'bottom';
ax1.YColor = 'magenta';
xlabel('P_{in} [dBm]','Fontsize',11);
ylabel('P_{out} [dBm]','Fontsize',11);
hold on;
ax2 = axes('Position',ax1_pos,'XAxisLocation','top','YAxisLocation','right',...
'XColor','black','YColor','blue','Color','none','XTickLabel',[]);
ylabel('Phi_{out} [deg]','Fontsize',11);
linkaxes([ax1 ax2],'x');
line(P_in,Phi_out_deg,'Parent',ax2,'Color','blue');
a = get(ax1,'Children');
b = get(ax2,'Children');
h = [a;b];
legend(h,'AM/AM','AM/PM','Location','northwest');
I know, this is very specific, but maybe you see why it doesn't work the way I want it to be.
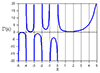
In this figure, in LaTeX, there is no colour except for blue and black:
figure
% grid lines
ax = axes('xlim', [-25 0], 'ylim', [-35 -5]);
g_x = -25:1.25:0;
g_y = -35:2.5:-5;
% Modify the location of the x and y minor tick marks
ax.XAxis.MinorTickValues = g_x;
ax.YAxis.MinorTickValues = g_y;
grid(ax,'minor')
grid on
hold on
plot(P1_d3data,D3_d3data,'sb')
hold on
plot(P1_d3data,polynom,'-b')
hold on
plot(Pin_sim,-D3_dsim1,'s','MarkerSize',10,'MarkerEdgeColor','black','MarkerFaceColor','green')
hold on
plot(Pin_sim,-D3_dsim2,'s','MarkerSize',10,'MarkerEdgeColor','black','MarkerFaceColor','m')
xlabel('Pin[dBm]')
ylabel('C/IM3 [dB]')
legend('C/IM3 Measurements','Measurement Regression','C/IM3 Simulation left','C/IM3 Simulation right','Location','southeast')
% LaTeX set up
height=8; width=12;
set( gcf, 'Units', 'centimeters' )
set( gcf, 'Position', [ 0 0 width height ] )
set( gcf, 'PaperUnits', 'centimeters' )
set( gcf, 'PaperSize', [ width height ] )
set( gcf, 'PaperPositionMode', 'Manual' )
set( gcf, 'PaperPosition', [ 0 0 width height ] )
box off
Here are the .tikz files - these are probably more helpful:
https://www.dropbox.com/s/pylakdx2mqrn17z/example1...
https://www.dropbox.com/s/43fl3uxz8x8oxsz/IMAL_val...
Like bhoward, I have also struggled with the task of including Matlab generated figures in a LaTeX document. To be frank with you, I would stay away from tools like "matlab2tikz". By using tools like this you are bringing in a lot of complex processing that you're not likely to understand and it only makes your situation worse and more frustrating when it doesn't produce the results you want.
I think a more straight forward and robust approach to take is to just work directly with the figure in Matlab. Of course there is a lot of tedious work this way, but once you have a method in place that works, you don't have to invest a lot more time to produce new figures.
You seem to have a good understanding of Matlab figures (you did not use the "plotyy" command), so taking a bit more time to establish a method that works for you shouldn't be too difficult.
With respect to your code, I had a look and edited what you provided,
close all; clear all; clc;
set(0, 'DefaultFigureWindowStyle', 'normal');

FONT_SIZE = 14;

g_x = -30:1.25:5; g_y = -35:2.5:-5;
P_in=-30:1.25:5; P_out=randn(1, numel(P_in)) - 20; Phi_out_deg=0.05.*rand(1, numel(P_in));

h=figure('Color', 'w'); ...

    hold on;
    line( P_in, P_out, 'Color', 'magenta' ); ax1 = gca;
    xlim([min(P_in) max(P_in)]); ylim([min(g_y) max(g_y)]);
    grid on;

    xlabel( 'P_{in} [dBm]', 'Fontsize', FONT_SIZE );
    ylabel( 'P_{out} [dBm]', 'Fontsize', FONT_SIZE );

    set( ax1, 'XTickLabel', g_x, 'YTickLabel', g_y, 'FontSize', FONT_SIZE );

    h_axis_1 = get(gca);
        ax1_pos = h_axis_1.Position;
        ax1_Xcolor = h_axis_1.XColor;
        ax1_Ycolor = 'm';
        ax1_X_AxisLocation = h_axis_1.XAxisLocation;

    ax2 = axes( 'Position', ax1_pos, ...
        'XAxisLocation', 'top', 'YAxisLocation', 'right', ...
        'XColor', 'black', 'YColor', 'blue', 'Color', 'none', ...
        'FontSize', FONT_SIZE, ...
        'YLim', [-0.5 0.5], ...
        'XTickLabel', [] );

    ylabel( 'Phi_{out} [deg]', 'Fontsize', FONT_SIZE );

    linkaxes( [ax1 ax2], 'x' );

    line( P_in, Phi_out_deg, 'Parent', ax2, 'Color', 'blue' );

    a = get(ax1, 'Children'); b = get(ax2, 'Children'); h = [ a; b ];
    legend( h, 'AM/AM', 'AM/PM', 'Location', 'northwest' );

    % Adjust axes 'Position' to make them both narrower (see http://stackoverflow.com/questions/18984154/matlab-ylabel-cutoff-using-plotyy-function).
    a=get(ax2, 'Position');  width_adjustment = 0.025;
        set(ax1,'Position', [a(1) a(2) a(3)-width_adjustment a(4)]);
        set(ax2,'Position', [a(1) a(2) a(3)-width_adjustment a(4)]);


% Prepare Figure for Saving
title( '' )
height=6;  width=6;
set( gcf, 'Units', 'inches' )
set( gcf, 'Position', [ 0 0 width height ] )
set( gcf, 'PaperUnits', 'inches' )
set( gcf, 'PaperSize', [ width height ] )
set( gcf, 'PaperPositionMode', 'Manual' )
set( gcf, 'PaperPosition', [ 0 0 width height ] )
box off
I saved the figure as either a PDF or EPS image and generated a single page PDF with the following LaTeX code compiled using PDFTexify.
\usepackage{graphicx}
\usepackage{caption}
\usepackage[margin=0.5in]{geometry}

\begin{document}

\begin{figure*}
    \centering
    \includegraphics[width=0.5\linewidth]{test_image.pdf}
    \caption{A Caption for the Figure}
\end{figure*}

\end{document
I've struggled to import plots, especially plots with a lot of data. I use raster, pdf, or eps to bring the plots in. For example, in Matlab I do something like this:
% Generate the plot
t = 0:0.2:110;
data = sin(2*pi*t*0.01);
h = figure('Name', 'Plot Window','position',[1 1 400 400]);
plot(t,data)
% Position the plot on the paper
set(gcf, 'PaperPositionMode', 'auto');
% Output pdf
print(h, '-dpdf', [mfilename '_Data.pdf'])
% Output eps
print(h, '-depsc', [mfilename '_Data.eps'])
% Output .png (raster) file
saveas(gcf, [mfilename '_Data'],'png')
I'm using Texmaker 4.5, this is the setup I use to bring in the different formats. You should see a three-page document with the different format on each page:
%% ----------------------------------------
%% Include all packages and set up document
%% ----------------------------------------
\documentclass[notitlepage]{article}
\usepackage[top=1in, bottom=1in, left=1in, right=1in]{geometry}
\usepackage{graphicx}
\usepackage{graphics}
\usepackage{float}
\usepackage{cleveref}
\usepackage{pdfpages}
\usepackage{epstopdf}
%% ----------------------------------------
%% Start Document
%% ----------------------------------------
\begin{document}

\section{Raster Files}
\Cref{fig:raster} shows the raster version
\begin{figure}[H]
    \centering
    \includegraphics[width=.4\textwidth]{TestPlot_Data.png}
    \caption{Raster file}
    \label{fig:raster}
\end{figure}

\newpage
\section{PDF Files}
\Cref{fig:pdf} shows the pdf version. This uses the {pdfpages} package.
\begin{figure}[H]
    \centering
     \includepdf[scale=0.7]{TestPlot_Data.pdf}
    \caption{PDF file}
    \label{fig:pdf}
\end{figure}

\newpage
\section{EPS Files}
\Cref{fig:eps} shows the eps file. This uses the {epstopdf} package.
\begin{figure}[!htb]
    \centering
    \includegraphics[scale=.7]{TestPlot_Data.eps}
    \caption{EPS Files}
    \label{fig:eps}
\end{figure}
\end{document}